Michael Bryan Ross

Product, Business, and More

Using IR remotes and receivers to turn on (or off) LEDs

In the search for the perfect DIY remote control for my soon-to-announce robot, I decided to explore IR remotes and receivers. They’re a neat little combo that help you send and receive signals without having to power or program your own external remote. If you’re interested in building some kind of remote to control whatever you’re making, look no further – you can probably repurpose the code below to meet your needs.

What you’ll need:

Arduino Uno R3 Microcontroller

Solderless Prototype PCB Breadboard

120pcs Multicolored Dupont Wire 40pin Male to Female, 40pin Male to Male, 40pin Female to Female Breadboard Jumper Wires

100pcs 5mm LEDs (10 colors x 10pcs) (fun colors!)

17 Values 1% Resistor Kit Assortment, 0 Ohm-1M Ohm (Pack of 525)

Infrared Wireless Remote Control IR Kit

Setup your circuits:
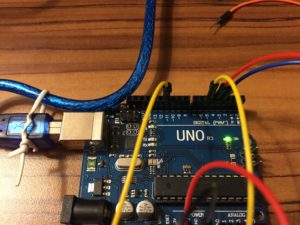
Right rail setup (pins 11, 5, 4, and 3)
Right rail setup (pins 11, 5, 4, and 3)

Left rail setup (5V and GND)
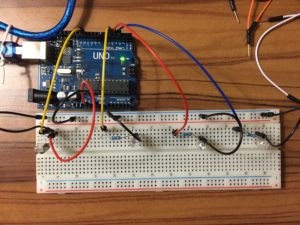
Left rail setup (5V and GND)

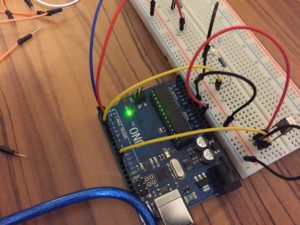
Top view of full setup
Top view of full setup

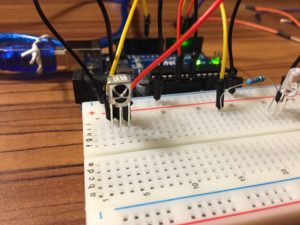
IR Receiver Setup (from left to right: data (pin 11), GND, 5V)
IR Receiver Setup (from left to right: data (pin 11), GND, 5V)

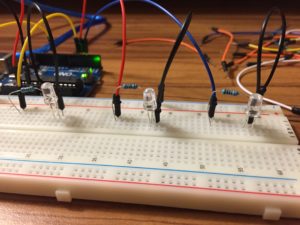
LED one to pin 5, LED two to pin 4, LED three to pin 3 from left to right.

LED one to pin 5, LED two to pin 4, LED three to pin 3 from left to right.

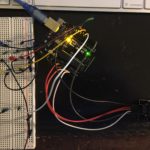
Follow along with the images above to get everything properly setup. Pay close attention to your LED circuits – I was moving so fast when I first set this up that I was off one row with the grounding or resistor on two different circuits! The standard setup for the LED circuits should be: data in, to 22ohm resistor, to power side of LED, to ground side of LED, to ground rail. Do this three times, and you should be all set. Also, for more fun, I’d recommend using three different color LEDs – It’s definitely not essential, but it sure does make it look cooler!

After you have your hardware all wired up, let’s check out the code. Here it is:

// By MichaelBryanRoss, with some help from Elegoo

// libraries included
#include <IRremote.h>

// pin declarations  
int RECV_PIN = 11;
int led1 = 5;
int led2 = 4;
int led3 = 3;

// decimal input values to match from reciever 
long int num1 = 16724175;
long int num2 = 16718055;
long int num3 = 16743045;

// variables that will change
int led1State = 0;
int led2State = 0;
int led3State = 0;

// object declaration
IRrecv irrecv(RECV_PIN);
decode_results results;

void setup(){
  Serial.begin(9600);
  irrecv.enableIRIn();
  irrecv.blink13(true);
  pinMode(led1, OUTPUT);
  pinMode(led2, OUTPUT);
  pinMode(led3, OUTPUT);
}

void loop(){
  if (irrecv.decode(&results)){
    Serial.println(results.value);
      if (results.value == num1 && led1State == 0){
        digitalWrite(led1, HIGH);
        led1State = 1;
      } else if (results.value == num1 && led1State == 1) {
        digitalWrite(led1, LOW);
        led1State = 0;
      }
       if (results.value == num2 && led2State == 0){
        digitalWrite(led2, HIGH);
        led2State = 1;
      } else if (results.value == num2 && led2State == 1) {
        digitalWrite(led2, LOW);
        led2State = 0;
      }
       if (results.value == num3 && led3State == 0){
        digitalWrite(led3, HIGH);
        led3State = 1;
      } else if (results.value == num3 && led3State == 1) {
        digitalWrite(led3, LOW);
        led3State = 0;
      }
    irrecv.resume();
  }
}

Let’s quickly review the code above, but let’s skip to the void loop (everything else is setup, but let me know if you need any there and I’d be happy to review). The first call to:

if (irrecv.decode(&results)){
Serial.println(results.value);

This is effectively a call to the library that says, “Hey, if the IR Receiver detects something, grab the results, and print it to the serial terminal.” If we really wanted to, we could skip the second line of code. However, it adds visibility by at least showing you in the terminal what you’re receiving. I find this super useful to better seeing what’s happening as you run the code.

The next part is where all the fun happens:

      if (results.value == num1 && led1State == 0){
        digitalWrite(led1, HIGH);
        led1State = 1;
      } else if (results.value == num1 && led1State == 1) {
        digitalWrite(led1, LOW);
        led1State = 0;
      }
       if (results.value == num2 && led2State == 0){
        digitalWrite(led2, HIGH);
        led2State = 1;
      } else if (results.value == num2 && led2State == 1) {
        digitalWrite(led2, LOW);
        led2State = 0;
      }
       if (results.value == num3 && led3State == 0){
        digitalWrite(led3, HIGH);
        led3State = 1;
      } else if (results.value == num3 && led3State == 1) {
        digitalWrite(led3, LOW);
        led3State = 0;
      }

In this section we essentially tell the system what to do when we see specific decimal values. We also introduce an “LED state” that basically allows us to remember if the LED is on or off. Tracking the state allows us to then write the code to simply turn on or turn off the LED based upon multiple button presses (There are probably other more memory efficient ways to do this, but this is just the approach that I chose to go with).

If you’re trying to turn something on or off based on the decimal value received from an IR remote, you should be able to repurpose this code accordingly. If you don’t need to maintain states, just delete those parts!

This last bit is simple:

    irrecv.resume();

It simple tells the receiver to continue listening for more commands.

Well, that’s it! You should now be well on your way to receiving and working with IR signals. Make sure to check out the video if you want to see the final results:
Electricity Basics – Potentiometers!

Potentiometers are sweet! Basically, they allow you to set a variable resistance to be applied to your circuit – which allows you to adjust the total resistance on the fly. This is most commonly used with LED displays, but there are many other use cases, too. Check out how cool they are:

The Joy of Joysticks: Reading Joystick Input with an Arduino

So I haven’t posted about it yet, but I’ve been working on a car-like robot. It’s a bigger project, and I’ll post about it soon. However, for that project I wanted to learn how to make a remote of sorts to direct the car around the room – so I purchased a joystick chip, and wired up some LEDs to learn how use the analog input to do something fun.

What you’ll need:

Arduino JoyStick

Multicolored Wire Kit (40pin Male to Female, 40pin Male to Male, 40pin Female to Female Jumper Wires)

Breadboards

Arduino UNO R3 Board

Setup your circuits:

I’m not going to go into deep detail on how to wire the LED circuits, but drop a comment if you can’t figure it out and I’d be happy to help. The new piece for this tutorial is the joystick. The joystick breakout has five pins: 1) ground, 2) 5 volt power, 3) x pin, 4) y pin, and 5) switch pin. The x and y pins are analog, while the switch is digital. If you don’t know the difference between these two, no problem – you can learn about the differences here.

Once you have this all wired up, here’s the code that you’ll want to write in your scratch:


//michaelbryanross

// define pins
const int SW_pin = 2; // digital, switch
const int X_pin = 0; // analog, X output
const int Y_pin = 1; // analog, Y output
const int blueLed = 12;
const int greenLed = 11;
const int redLed = 10;
const int yellowLed = 9;
const int whiteLed = 8;

// setup pins
void setup() {
  pinMode(SW_pin, INPUT);
  pinMode(blueLed, OUTPUT);
  pinMode(yellowLed, OUTPUT);
  pinMode(redLed, OUTPUT);
  pinMode(greenLed, OUTPUT);
  pinMode(whiteLed, OUTPUT);
  digitalWrite(SW_pin, HIGH);
  Serial.begin(9600);
}

// main loop
void loop() {
  //prints some stuff to read out in the serial monitor (skip this part if you don't want to see the output)
  Serial.print("Switch:  ");
  Serial.print(digitalRead(SW_pin));
  Serial.print("\n");
  Serial.print("X-axis: ");
  Serial.print(analogRead(X_pin));
  Serial.print("\n");
  Serial.print("Y-axis: ");
  Serial.println(analogRead(Y_pin));
  Serial.print("\n\n");

  // LED logic
  if(analogRead(Y_pin) == 1023)
  {
    digitalWrite(yellowLed, HIGH);
    delay(500);
    digitalWrite(yellowLed, LOW);
  } else if (analogRead(Y_pin) == 0) {
    digitalWrite(blueLed, HIGH);
    delay(500);
    digitalWrite(blueLed, LOW);
  } else if (analogRead(X_pin) == 1023) {
    digitalWrite(redLed, HIGH);
    delay(500);
    digitalWrite(redLed, LOW);
  } else if (analogRead(X_pin) == 0) {
    digitalWrite(greenLed, HIGH);
    delay(500);
    digitalWrite(greenLed, LOW);
  } else if (digitalRead(SW_pin) == 0) {
    digitalWrite(whiteLed, HIGH);
    delay(500);
  } else {
    digitalWrite(blueLed, LOW);
    digitalWrite(yellowLed, LOW);
    digitalWrite(redLed, LOW);
    digitalWrite(greenLed, LOW);
    digitalWrite(whiteLed, LOW);
  }
  delay(100);
}

If this doesn’t make sense, I would recommend running the code without the LEDs first, and looking at the serial monitor. If you use the serial section above, you’ll be able to see the different outputs that the joystick produces. After you see those values, the else/if block should make a little more sense.

Here’s the thing in action:

As always, please let me know if you have any questions!

Every Zillow Group Brand in RGB LEDs

How to Blink Every Zillow Group Brand in RGB LEDs

In previous posts I’ve been using standard LEDs – however, now we’re cooking with gas… welcome, RGB LEDs. These LEDs are way cooler than standard LEDs, because this one LED actually has three different LEDs inside it. As the name suggests, there’s one red, green and blue LED in each RGB LED. You can then use Pulse Width Modulation (PWM) and some simple code to have that one LED become any RGB color under the sun!

I was going to use these LEDs to cycle through every NFL team’s primary and secondary colors, but then I thought… what’s cooler than the NFL? Zillow Group, of course! So, in the code below I filter through every Zillow Group brand’s primary and secondary color. If Zillow Group isn’t your thing (even though it should be) you can use this code to filter through any list of two-color organizations that you’d like – just replace the ZG color values with the color values of your choosing.

What you’ll need:

Arduino UNO R3 (Kit, but can just get the Ardunio)

Round Head Common Cathode RGB LED (50 Pack – only need 2 for this tutorial)

40pin M to F, 40pin M to M, 40pin F to F Ribbon Cables Kit

220 Ohm Resistors (Pack of 25)

Breadboard(s)

Wire the Circuits

The circuits are pretty simple – just make sure that you know if you’re working with an cathode LED or an anode LED (the ones I used are cathode, and so is the link above). The most important part is to make sure that you connect to a pin that is capable of PWM (I wont write about PWM here, but check it out on Wikipedia if you want to learn more about what this is). In this tutorial I’ve used pins 3, 5, 6, 9, 10, and 11 (some boards have a “~” indicating that the pin is PWM compatible).

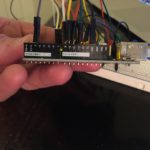
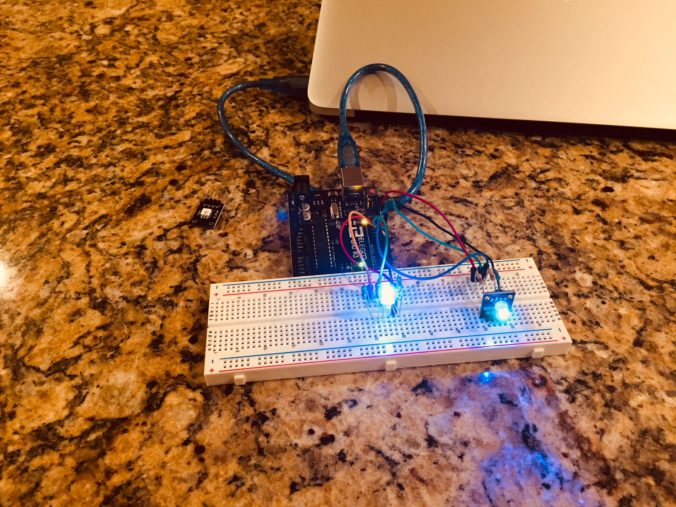
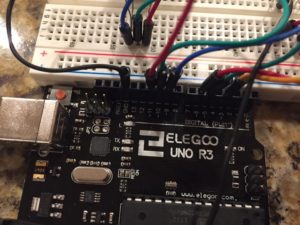
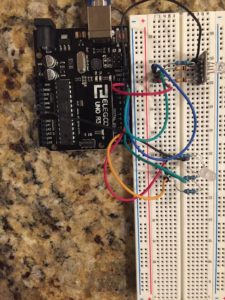
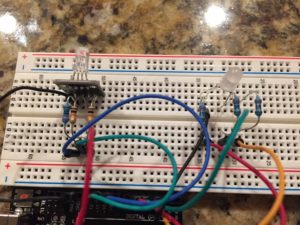
Here are a few different angles of my setup:

RGB LED Circuits, Pin View

RGB LED Circuits, Pin View

RGB LED Circuits, Top View

RGB LED Circuits, Top View

RGB LED Circuits, Breadboard View

RGB LED Circuits, Breadboard View

The Code

//MichaelBryanRoss

// Define Pins
int redPin = 11;
int greenPin = 10;
int bluePin = 9;

int redPin2 = 6;
int greenPin2 = 5;
int bluePin2 = 3;

void setup()
{
pinMode(redPin, OUTPUT);
pinMode(greenPin, OUTPUT);
pinMode(bluePin, OUTPUT);

pinMode(redPin2, OUTPUT);
pinMode(greenPin2, OUTPUT);
pinMode(bluePin2, OUTPUT);
}

// main loop
void loop()
{
  color(255,255,255,0,116,223); //Zillow
  color(255,255,255,0,161,106); //Trulia
  color(255,255,255,33,47,97); //StreetEasy
  color(76,75,77,234,63,51); //RealEstate.com(gray and red)
  color(238,123,51,77,174,198); //Naked Apartments(orange and teal) 
  color(237,118,81,248,211,101); //hotpads(orange-red and yellow)
  color(0,0,0,255,255,255); //Outeast 
}

void color(int red, int green, int blue, int red2, int green2, int blue2 )
{
  analogWrite(redPin, red);
  analogWrite(greenPin, green);
  analogWrite(bluePin, blue);
  analogWrite(redPin2, red2);
  analogWrite(greenPin2, green2);
  analogWrite(bluePin2, blue2);
  delay(1000);
}

*Note on the code – this is not python code. It’s C – however, the wordpress plugin I’m using for code inserts does not have a setup for C, so I just kept it stylized as Python).

There you go! Compile the code and run it on your Arduino and you now have a rotating blinking of all the ZG brand’s colors!

PS – this post does not in any way reflect Zillow Group values or opinions.

PPS – Spencer, if you’re reading this… you made my day! (and please know that past Hackweeks are exactly what got a Program Manager interested in learning to code hardware. )


Blinking LEDs with a Raspberry Pi

Getting Started

Ok, I’m hooked (again) on raspberry pis! I I was recently cleaning out my office and I stumbled across my old type B raspberry pi – you know, the old school one with only two USB ports, no wifi, and the big SD card holder? Despite the aging technology, I had been looking for a new hobby and it seemed like fate to stumble across the device.

As I fired it back up, it made me remember how disparate the hardware scene is. I’m a wanna-be programmer and I work in tech – and I still found it difficult to piecemeal together all of the stuff that I had to do to get the raspberry pi up and running! This made me decide that I would jump in and write a few blogs on getting started with a raspberry pi, and hopefully help others start some raspberry pi projects in 2018.

Let’s start with the basics – lighting up some LEDs. Here’s all the stuff that you’ll need:

I’d strongly recommend that even if you want to do other projects and you see a better deal on some big package of components that you start small and just get these items. Don’t go over board and buy a ton of stuff before you know if you really will stick with this hobby! Parts are cheap, but they add up and take up a good amount of physical space… (but if you definitely want a kit, the CanaKit Raspberry Pi 3 Ultimate Starter Kit – 32 GB Edition is a great one).

Wiring up a Raspberry Pi and LED

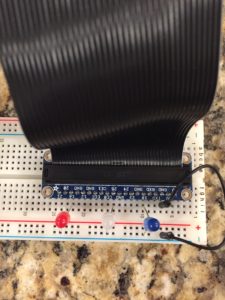
Let’s keep it simple – just match the LEDs to the pins as shown in this photo:

Wiring up LEDs to a Raspberry Pi with a breadboard

Wiring up LEDs to a Raspberry Pi with a breadboard

If you can’t quite see the pin numbers in the image, I have the red LED in pin 16, the white LED in pin 25, and the blue LED in pin 18.  (Why the patriotic colors? At the time of writing this post the 2018 Winter Olympics were on, and I felt inspired by the amazing athletes! I promise, I’m not an ethnocentric American!)

After wiring up the LEDs, you’ll need to write a source file that controls the LEDs. If you’re a beginner, feel free to take the code below and just copy it onto your Pi. If you’re a code wizard, don’t judge my code – remember, I’m a fo-grammer not a programmer.

Name the file “leds.py” and add the following content:

——–start code——–


import RPi.GPIO as GPIO
import time

GPIO.setmode(GPIO.BCM)
GPIO.setwarnings(False)

redPin = 16
whitePin = 25
bluePin = 18

GPIO.setup(redPin, GPIO.OUT)
GPIO.setup(whitePin, GPIO.OUT)
GPIO.setup(bluePin, GPIO.OUT)

def red(x):
  GPIO.output(redPin, GPIO.HIGH)
  time.sleep(x)
  GPIO.output(redPin, GPIO.LOW)

def white(x):
  GPIO.output(whitePin, GPIO.HIGH)
  time.sleep(x)
  GPIO.output(whitePin, GPIO.LOW)

def blue(x):
  GPIO.output(bluePin, GPIO.HIGH)
  time.sleep(x)
  GPIO.output(bluePin, GPIO.LOW)

def fullBlink(x):
  GPIO.output(redPin, GPIO.HIGH)
  GPIO.output(whitePin, GPIO.HIGH)
  GPIO.output(bluePin, GPIO.HIGH)
  time.sleep(x)
  GPIO.output(redPin, GPIO.LOW)
  GPIO.output(whitePin, GPIO.LOW)
  GPIO.output(bluePin, GPIO.LOW)

def party():
  try:
    while True:
      red(.5)
      white(.5)
      blue(.5)
      fullBlink(.5)
      blue(.5)
      white(.5)
      red(.5)
      fullBlink(.5)
  except KeyboardInterrupt:
    GPIO.output(redPin, GPIO.LOW)
    GPIO.output(whitePin, GPIO.LOW)
    GPIO.output(bluePin, GPIO.LOW)

party()

——–end code——–

After saving the file above, run this command in terminal:

Turn on LEDs from the Command Line

Turn on LEDs from the Command Line

I’m doing this via SSH in the terminal on my Mac, but you can run it on the Pi directly, too. And voila! Now you have a blinking Team USA LED light show!

If you need any help with these setup steps, leave a comment and I’ll help you out. Also, if you have any future hardware requests, drop a note and I’ll attempt to make it!

What Exactly are Product Wireframes?

For those of you new to the product management world, you may have heard the term product wireframes a few times in casual conversations. The idea isn’t really that complicated, but the process of creating product wireframes is essential (and pretty easy, too).  A product wireframe is simply a rough sketch of the thing that you hope to build. It could be a new feature, a redesign, or a completely new product / business venture. No matter what the thing you’re building, however, you should always start with a very rough product wireframe.

Step 1: Start the Product Wireframes

Remember the old KISS idiom (Keep it simple, stupid)? Remember that as you’re wireframe-ing a product. Literally grab a piece of paper, or grab a free whiteboard at work. Draw out the think that you envision, and think through all of the user scenarios that you can think of while you work. I like to limit myself to 15 minutes – mainly because I don’t want my product wireframes to get too granular just yet (and you are, after all, only on the first of many steps of the design process). After you’ve drawn out the feature as you see it, grab someone close to the product that you’re working on and talk through it. They’ll inevitably have some items to add, which is perfect – because product development is an iterative cycle, and the more minds applied, the better (Within reason, however. There is, in my opinion, a certain attrition to the usefulness of insider feedback). After you’ve completed your 15 minute session, and grabbed a companion to vet out your rough concept, take a few photos of your drawings – and now sleep on it, and revisit the wireframes once more before you finalize the rough concept.

Sample Pencil Paper Product Wireframes

Sample Pencil Paper Product Wireframes

Step 2: Gather the Stakeholders

If you’re building a feature or a new product, there are usually other people involved. At this point in the game, I like to gather the troops and make sure that there are no other opinions that may have been missed in your independent brainstorming session with your other product buddy. It’s important that you invite anyone to this meeting that may have some kind of final say in the way that this feature or product is developed. Getting their feedback and buy in early in the design process is hugely important. Knowing everyone’s must haves as soon as possible will lead to a more complete feature, saving everyone time and money. For some companies this may include your CEO, CTO,  PMs, Sales, other teams that might be a part of an integration, etc. Keep this meeting very high level, and frame it as a discovery meeting. If you want, you can show them the photos of your beautiful drawings, but it’s not mandatory. That step is more to help you gather your thoughts before you meet with the others.

Step 3: It’s Time for Product Specs

Take the information that you just gathered, and make sure that you’re collecting all of the information somewhere. I prefer confluence for my product specs,  mainly because it’s simple, easy to use, and it integrates nicely with JIRA, a software product management platform. If confluence seems like too much extra work for you at this stage of the game, just use your Mac Notes or a Google Doc. The important part is that as you gather requirements and feedback, that you’re saving it all in one place. Don’t get into the nitty gritty of your product specs just yet, but instead, use the product pages as a place to list everything that you’ve learned, and any open questions that you may still have.

Step 4: Digitize the Product Wireframes

Now that you’ve slept on the rough sketch, gathered more feedback from others, and begun to spec out your budding feature, it’s time to digitize the thing. Use a wireframe software system (Like Balsamiq or Adobe XD) to kick off a digital version of your brainchild. This will make explaining your idea to others far more simple, and will also be a great next step for professional designs. As you spec out the rough wireframes and general user experience, make sure to document what is and is not necessary as you plan out your product (Aren’t you glad that you have a product page for that?). This is when I typically start itemizing some of the dev work that will be required into my more formal product specs – but remember, your final designs may change the look and feel of the thing that you’re creating, so stay away from too detailed of wireframes for now. Instead, focus on the data that you need, the system requirements, the integrated functionality, and all the other mumbo jumbo that comes along with a product.

Sample Product Wireframes

Sample Product Wireframes (#1)

Sample Product Wireframes

Sample Product Wireframes (#2)

Step 5: The Product Deep Dive

I won’t go into a ton of detail on the deep dive into a product kickoff, but will instead congratulate you – because you just completed the necessary steps to create product wireframes! Remember, now that you have a rough look and feel of the product, I’d again let key stakeholders review the wireframes. Just let them provide some quick feedback – and then you can send them off to design!

While the process of creating product wireframes isn’t too exhausting or too crazy, it is an essential part of any product’s development. Make sure that you perform each of the steps above. I’ve found that while it can be easier to skip some of these steps, doing so will just create pain later in your product development process. This makes the feature or product take longer to develop, leads to more unintended ‘updates’, and simple slow you down and dishearten your team. Make your mocks, get your feedback, and you’re off to the races!

Managing a Product Backlog

A Jar of Rocks – a Product Backlog Analogy

I was in a meeting with my manager the other day, and he said something that really stuck with me – he said that I needed to make sure that I was thinking of the product backlog as a jar of rocks. He went on to recount the story that we all heard back in 5th grade science class, and reminded me that the order in which you put the rocks into the jar matters! It directly determines how many rocks you will be able to fit into your jar. You have to start with the big rocks, and then pour in the sand to fill up the rest of the jar. If you do it the opposite way, and start with the sand, you’ll never be able to fit all of the big rocks in.

This directly applies to planning items that will be worked in future sprints. Start with the big rocks, and then pour in a little sand each time. The rocks being big feature components, and the sand being the little fixes and small things that can wait.

What’s a product backlog?

For those of you that are not familiar with product management, a backlog is essentially your list of things to do, broken down in digestible chunks of  work. If you’re using tools like JIRA then you can then sort the items from top to bottom, with the most important things on top, and the less important items on the bottom. The top / bottom ranking, in my opinion, is very valuable because it forces you to rank items in the order that they will be completed. It sets clear expectations of what and when something will be worked.

How to manage a product backlog?

Managing the items in a product backlog can be really really hard. That’s simply because you usually have waring stakeholders – business people want business things, data people want data things, and your users typically want a completely different list of items. As a product manager, you’ll always have to balance the demand of different stakeholders – and this really comes to light when you’re planning the work on the backlog.

I always start with priority of the items on the backlog first. ‘Blockers’ are the first items that you should complete. A blocker is something that breaks some core functionality of the product, and it typically prevents some user from being able to complete their core task. That could be a serious data error that prevents Business Intelligence from being able to run an analysis, a product user from being able to complete their core function, or something equally as bad. A blocker is NOT something that someone simply wants, but it should instead have some serious implication that can be easily measured or seen by many users. Blockers are typically shipped outside of sprints, in a hot fix release.

After you get past any known blockers, you have to start with the ‘big rocks’ that are in your product backlog. These are the features or items that you know will help improve the product or meet some new business objective. They are typically larger items that will take one engineer most of a sprint. Put these items at the top of the product backlog first, and then start squeezing in the smaller items. Some of those smaller items might be user interface bugs, text change requests, and other small tweaks that will usually take a small amount of time for an engineer to complete.

Sorting out your backlog in this way will really help your team stay focused and complete the items that are core to your product’s value prop. Filling in the remaining free time with smaller fixes will create some little wins along the way, as well.

How to groom a product backlog?

If there’s one constant in product management, it’s change. Anyone that’s ever worked on any software development team knows that change – and they change regularly. This means that your backlog should also change regularly! I suggest that every week you review the backlog with your lead dev, and / or any other essential stakeholder. You can then review the items that are on the backlog, and move them up or down as the team sees fit. Performing a backlog groom regularly will help make sure that the team is focusing on the items that are truly necessary, and will keep the sand from building up. Remember, blockers stay in the number one spot – so if you find your team shuffling it downwards, it’s probably not truly a blocker. If that happens, bump it’s priority downward.

Having your product backlog nicely groomed will make sprint planning with your engineers go even easier, as well. When your team can clearly see what’s going on, and they know exactly what they should be tackling, you will see your velocity increase – which is what every product manager wants!

As the product manager, you’re in charge of the process and the flow of the team. Having a clean and ordered product backlog creates a clear list of objectives and tasks that teams can then easily work their way down. This provides clear insight into what needs to be accomplished to the team, external stakeholders, and yourself. As you’re reviewing the product backlog, make sure that you see plenty of big rocks, with the little stuff squeezed in around the edges.

Analyzing a Product: The Must Ask Questions

I was recently asked to analyze a product that someone was building, and it left me wondering how exactly I would explain the process to a non product person. It seemed like this interaction could make a nice blog, so without further ado, here’s my two cents on the questions you should think through when you’re analyzing a product:

Analyzing a Product: The Basics Questions

Ask “Why.”

If you’ve read some of my past blogs, then you already know that you should always start with a why. Why would someone use this product? Starting with this simple question, you’ll begin to force the person that you’re speaking with to boil down the idea. This will help you better understand what pain point they’re trying to solve, which in turn will help you craft a product that truly meets a need.

Who will use this product?

If the “why” didn’t get you there, it’s usually helpful to ask who explicitly the creator sees as being the primary user of the product. I dare you to think through the answer that you’re given, and make sure that the persona identified has the need described in the “why.” Identifying the “who” will also help you confirm if the product should be  a web product, a mobile product, etc. Knowing who the intended target of a product is will be essential in your process of analyzing a product.

What do you think your customers want?

People who are developing products in their free time have a tendency to only show their creations to their closest of friends. Which means, some of these core questions are rarely thought that far out. So, when you ask these questions, I would recommend that you dig in a bit. Don’t take the defined target as accurate or right – but instead challenge the person you’re speaking with a bit. If they say that their target market are young moms, think through the user with them, and challenge them on if it’s the right market. This will help you surface thoughts that the person you’re speaking with has been thinking, but hasn’t explicitly said yet, which will ultimately help get you to the core of the product even faster.

Analyzing a Product: Identifying the Problem

What problems will this product help a user solve?

I am a firm believer that people use products to solve some problem. So, when analyzing a product, it’s essential to identify this problem as immediately as possible. If a core problem cannot be identified, then this product might not have a true need – which means that it will most likely not be a successful product. Sometimes the problem is not as ‘surface-level’ as you’d hope, but dig into why the person created the product in the first place, and you might stumble upon the core problems that users face.


Analyzing a Product: Reviewing the Competition

What are the existing products lacking?

When analyzing a product, you have to ask what the existing products on the market lack. This will help you get to the core of the value prop, which is truly the heart of the product and it’s resonating message to future users.

What other products on the market would a user consider using instead of your product?

This question is really just to see what the creators used as their early ‘vision’. Knowing this will help you learn about the creators, and also help you understand the look and feel of their original inspiration. It can also help you more quickly identify if the V1 of the product should be mobile or desktop.


Analyzing a Product: The Switch

What would help motivate someone to switch to your product?

Why the heck would someone use the product!? There better be a dang good answer here – because if there’s not, then you know the product is going to fall flat on its face. This again gets at the value prop of the product. Can you tell how important getting a well rounded answer here is?

Would the user even consider using your product if they are already using a competitors? 

This question is typically a good followup question to the one above – only because it forces the creator to really emphasize the core value prop one again, and usually more concisely than the first answer.

How difficult is it for the user to switch from the other product?

Switching is terrible. There’s a reason we all keep the same crappy cable contracts, cell phones, etc, and that’s because switching is hard! You’ve invested time into all of the things that you use… so why would you be willing to go through this painful period again? Getting to the crux of this question will again force the creator on the idea of the value prop. At this point, if you feel like you have a good impression of the value prop, you can leave this one out.

Analyzing a Product: A Few Other Thoughts

Have you asked many people about your product? What do they say?

Creators should be asking everyone about their products! If they’re not, then they’re afraid of something – and if they’re afraid of something, then they typically know something that they’re not telling you.

What would you Google to find this business?

This one is more about helping the creator boil their concept down to a few word phrase. This is again about getting at the value prop – which is essential for the creator, and the product person! You must know what drives your user!

Analyzing a Product: That’s All!

There you have it! The above are the initial questions that I typically ask when reviewing a product with someone. These questions are only intended to be guiding questions, and they are by no means a required list of questions that you must ask in a certain order – instead, they’re just guiding questions that you can use to help get to the core of a product, and better feel out the creator of the product. Have fun analyzing products, and let me know if you ever have an additional questions!

People use products for a reason.

My main questions for every product development project that I work on are variations of “why”? Why was the product built? Why is the product needed? Why will the product continue to be needed? Why would someone choose this product over some other competitor out there? I don’t ask these questions to pester the creator, but more, to make sure that they themselves understand their “why”.

Figure out why people use your product.

Getting to “why” in the various situations above can be hard, but it’s an essential to defining the core essence of your product. You need to have a “why”. It will help you understand who uses your product, where they use it, when they’ll use it, and many other factors that will help craft other elements of your product – like its design, its development strategy, and more.

As cheesy as it might be to plug a Ted Talk, while we’re on the question “Why” I have to plug Simon Sinek:

Getting to “why” isn’t an option.

it’s an essential part of any product development strategy. If you know your why, your customers will innately ‘feel’ it. This will lead to a unified vision within your company, will reduce product confusion between key stakeholders, and will indirectly translate into greater sales and profits. It will also help keep your features and development scopes in line – because instead of running off on tangents, the “why” will act as a glowing light that keeps you on the right path. It will become the basis of your vision, and will unify your team and different business groups.

So, without further ado, can you tell me your company’s “why”? Is it at the core of your product development strategies? If it’s not, get there fast – because without a solid “why,” you’ll be left wondering “how” things got so far from your original goal!


© 2024 Michael Bryan Ross

Theme by Anders NorenUp ↑