
How to Blink Every Zillow Group Brand in RGB LEDs
In previous posts I’ve been using standard LEDs – however, now we’re cooking with gas… welcome, RGB LEDs. These LEDs are way cooler than standard LEDs, because this one LED actually has three different LEDs inside it. As the name suggests, there’s one red, green and blue LED in each RGB LED. You can then use Pulse Width Modulation (PWM) and some simple code to have that one LED become any RGB color under the sun!
I was going to use these LEDs to cycle through every NFL team’s primary and secondary colors, but then I thought… what’s cooler than the NFL? Zillow Group, of course! So, in the code below I filter through every Zillow Group brand’s primary and secondary color. If Zillow Group isn’t your thing (even though it should be) you can use this code to filter through any list of two-color organizations that you’d like – just replace the ZG color values with the color values of your choosing.
What you’ll need:
Arduino UNO R3 (Kit, but can just get the Ardunio)
Round Head Common Cathode RGB LED (50 Pack – only need 2 for this tutorial)
40pin M to F, 40pin M to M, 40pin F to F Ribbon Cables Kit
220 Ohm Resistors (Pack of 25)
Wire the Circuits
The circuits are pretty simple – just make sure that you know if you’re working with an cathode LED or an anode LED (the ones I used are cathode, and so is the link above). The most important part is to make sure that you connect to a pin that is capable of PWM (I wont write about PWM here, but check it out on Wikipedia if you want to learn more about what this is). In this tutorial I’ve used pins 3, 5, 6, 9, 10, and 11 (some boards have a “~” indicating that the pin is PWM compatible).
Here are a few different angles of my setup:
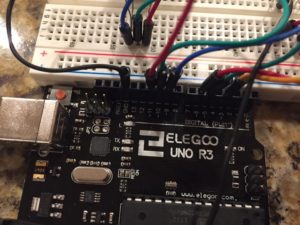
RGB LED Circuits, Pin View
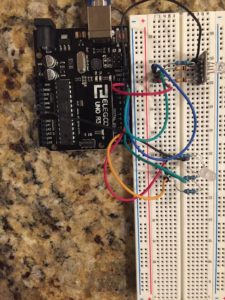
RGB LED Circuits, Top View
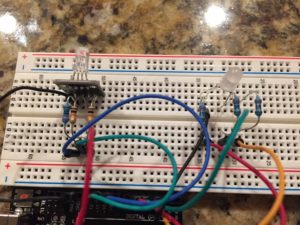
RGB LED Circuits, Breadboard View
The Code
//MichaelBryanRoss

// Define Pins
int redPin = 11;
int greenPin = 10;
int bluePin = 9;

int redPin2 = 6;
int greenPin2 = 5;
int bluePin2 = 3;

void setup()
{
pinMode(redPin, OUTPUT);
pinMode(greenPin, OUTPUT);
pinMode(bluePin, OUTPUT);

pinMode(redPin2, OUTPUT);
pinMode(greenPin2, OUTPUT);
pinMode(bluePin2, OUTPUT);
}

// main loop
void loop()
{
  color(255,255,255,0,116,223); //Zillow
  color(255,255,255,0,161,106); //Trulia
  color(255,255,255,33,47,97); //StreetEasy
  color(76,75,77,234,63,51); //RealEstate.com(gray and red)
  color(238,123,51,77,174,198); //Naked Apartments(orange and teal)
  color(237,118,81,248,211,101); //hotpads(orange-red and yellow)
  color(0,0,0,255,255,255); //Outeast
}

void color(int red, int green, int blue, int red2, int green2, int blue2 )
{
  analogWrite(redPin, red);
  analogWrite(greenPin, green);
  analogWrite(bluePin, blue);
  analogWrite(redPin2, red2);
  analogWrite(greenPin2, green2);
  analogWrite(bluePin2, blue2);
  delay(1000);
}
*Note on the code – this is not python code. It’s C – however, the wordpress plugin I’m using for code inserts does not have a setup for C, so I just kept it stylized as Python).
There you go! Compile the code and run it on your Arduino and you now have a rotating blinking of all the ZG brand’s colors!
PS – this post does not in any way reflect Zillow Group values or opinions.
PPS – Spencer, if you’re reading this… you made my day! (and please know that past Hackweeks are exactly what got a Program Manager interested in learning to code hardware. )