Getting Started
Ok, I’m hooked (again) on raspberry pis! I I was recently cleaning out my office and I stumbled across my old type B raspberry pi – you know, the old school one with only two USB ports, no wifi, and the big SD card holder? Despite the aging technology, I had been looking for a new hobby and it seemed like fate to stumble across the device.
As I fired it back up, it made me remember how disparate the hardware scene is. I’m a wanna-be programmer and I work in tech – and I still found it difficult to piecemeal together all of the stuff that I had to do to get the raspberry pi up and running! This made me decide that I would jump in and write a few blogs on getting started with a raspberry pi, and hopefully help others start some raspberry pi projects in 2018.
Let’s start with the basics – lighting up some LEDs. Here’s all the stuff that you’ll need:
- Raspberry Pi 3 Model B
- Raspberry Pi T-Cobbler with GPIO Cable
- Breadboard w/ Jumper Wires
- LEDs and other components for Raspberry Pi
I’d strongly recommend that even if you want to do other projects and you see a better deal on some big package of components that you start small and just get these items. Don’t go over board and buy a ton of stuff before you know if you really will stick with this hobby! Parts are cheap, but they add up and take up a good amount of physical space… (but if you definitely want a kit, the CanaKit Raspberry Pi 3 Ultimate Starter Kit – 32 GB Edition is a great one).
Wiring up a Raspberry Pi and LED
Let’s keep it simple – just match the LEDs to the pins as shown in this photo:
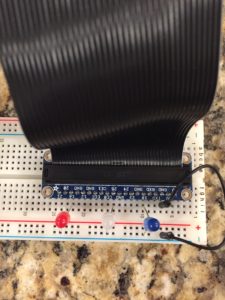
Wiring up LEDs to a Raspberry Pi with a breadboard
If you can’t quite see the pin numbers in the image, I have the red LED in pin 16, the white LED in pin 25, and the blue LED in pin 18. (Why the patriotic colors? At the time of writing this post the 2018 Winter Olympics were on, and I felt inspired by the amazing athletes! I promise, I’m not an ethnocentric American!)
After wiring up the LEDs, you’ll need to write a source file that controls the LEDs. If you’re a beginner, feel free to take the code below and just copy it onto your Pi. If you’re a code wizard, don’t judge my code – remember, I’m a fo-grammer not a programmer.
Name the file “leds.py” and add the following content:
——–start code——–
import RPi.GPIO as GPIO
import time

GPIO.setmode(GPIO.BCM)
GPIO.setwarnings(False)

redPin = 16
whitePin = 25
bluePin = 18

GPIO.setup(redPin, GPIO.OUT)
GPIO.setup(whitePin, GPIO.OUT)
GPIO.setup(bluePin, GPIO.OUT)

def red(x):
  GPIO.output(redPin, GPIO.HIGH)
  time.sleep(x)
  GPIO.output(redPin, GPIO.LOW)

def white(x):
  GPIO.output(whitePin, GPIO.HIGH)
  time.sleep(x)
  GPIO.output(whitePin, GPIO.LOW)

def blue(x):
  GPIO.output(bluePin, GPIO.HIGH)
  time.sleep(x)
  GPIO.output(bluePin, GPIO.LOW)

def fullBlink(x):
  GPIO.output(redPin, GPIO.HIGH)
  GPIO.output(whitePin, GPIO.HIGH)
  GPIO.output(bluePin, GPIO.HIGH)
  time.sleep(x)
  GPIO.output(redPin, GPIO.LOW)
  GPIO.output(whitePin, GPIO.LOW)
  GPIO.output(bluePin, GPIO.LOW)

def party():
  try:
    while True:
      red(.5)
      white(.5)
      blue(.5)
      fullBlink(.5)
      blue(.5)
      white(.5)
      red(.5)
      fullBlink(.5)
  except KeyboardInterrupt:
    GPIO.output(redPin, GPIO.LOW)
    GPIO.output(whitePin, GPIO.LOW)
    GPIO.output(bluePin, GPIO.LOW)

party()
——–end code——–
After saving the file above, run this command in terminal:
Turn on LEDs from the Command Line
I’m doing this via SSH in the terminal on my Mac, but you can run it on the Pi directly, too. And voila! Now you have a blinking Team USA LED light show!
If you need any help with these setup steps, leave a comment and I’ll help you out. Also, if you have any future hardware requests, drop a note and I’ll attempt to make it!